Wednesday, August 3, 2011

Special Chocolate Chip Cookies

The other day, a recipe on Pinterest caught my eye. I saw these amazing looking chocolate chip cookies.

Immediately my mouth started to water. I analyzed the picture; it looked tender and chewy. You can see lots of recently melted chocolate chips, and it was (most importantly) large. Now you know why it caught my attention.

So onwards I clicked and low and behold a surprise awaited me. I read through the ingredients to see why this one was unique. Flour (check), brown sugar (no white sugar... okay ... check), vanilla.... hmm. Something was missing, and it was the butter. These cookies were made with coconut oil! Who's ever heard of such a thing, I thought to myself. Butter = Cookies, but the picture did look amazing.

The next day, I stood in the baking aisle staring at the coconut oil. It was close to $6 (I hesitated), but I reasoned that it was an investment and I should move forward. I'm so glad I did. I made the cookies, took them to my community group last night, and we devoured them. This is by far the best chocolate chip cookie recipe I've made. It takes me a really long time to find a favorite, but this is certainly it. Go grab some coconut oil, and let me make a believer out of you!

Here's how you make them:

Ingredients:
1/2 cup coconut oil - mine was melted... I'm not sure if it was supposed to be solid, but it's been so stinkin' hot here, I don't know if solidity would be possible. If yours melts like mine, don't worry.
2 eggs
1 1/2 cups brown sugar
1/2 teaspoon salt
1 teaspoon baking powder
1/4 teaspoon baking soda
1 tablespoon vanilla
1 3/4 cup flour
1 bag chocolate chunks (or whatever your chip preference is)

Directions:
1. Preheat your oven to 400. Line a cookie sheet with parchment paper.
2. Mix the first 3 ingredients together until well blended.
3. Add everything else, and mix until incorporated.
4. Scoop huge scoop (2 1/2 - 3 tablespoons) of dough onto the cookie sheet. You should be able to fit 6 per average sized sheet.
5. Bake for 9-11 minutes or until edges are beginning to turn a golden brown. Try to wait for them to cool, but if you were like me and can't be warned: you will burn your mouth because you will inhale them.


Monday, August 1, 2011

Cherry Limeade Cupcakes

Game night means dessert, and I wanted to find something that was incredibly festive to make. I was looking over at Annie's Eats, and I found a recipe for Cherry Limeade Cupcakes. These looked perfect so I decided to make them. Here's my finished product:

And I packed them up so they were ready to go!
They were super tasty, but they were super sweet. I think if I make them again that I will make them mini. If you like sweet, you will love these, but if that's not your thing, you may want to opt for something else.

For the recipe, click here.

Sunday, July 31, 2011

Make-over and Re-Purpose

For a while now, I've wanted to refinish this yellow lamp that I have had since I was itty-bitty. I think it was actually my mom's. It was in my room, and as a mere child I took the creative liberty to draw all over it with a pen and to adorn it with stickers. While I was able to remove the stickers, the pen marks were unfortunately stuck on... sad really because it was a cool color. At any rate, I liked the shape, so I decided to spray paint it. I used the Champagne color from Rustoleum.

Fabric from JoAnn's

It turn out lovely; however, I couldn't find a shade suitable to match it. (Everything in our bedroom has a golden hue, and many shades have this too. They were all just blending into the wall.) Granted I only went to Target, but I was refuse to pay much for a lamp shade. After looking on Pinterest (*obsession*), I found a tutorial on how to make a cover for your lamp shade. All you do is spray it with glue and smooth down the fabric. It was so incredibly easy, and it turned out amazing! *Warning - Do NOT iron it; it will start to melt the shade... needless to say that side is facing the wall.* So far, I was two for two (minus the melt-age.)

This is my lovely Lucy girl investigating the new fixture.

Finally, some of our dear friends recently moved away. I offered to take some of their unneeded items up to Goodwill, and I found a lovely candlestick that they couldn't use any longer. I just planned on keeping it on hand just in case, but then, creativity struck! I decided to use it as a bracelet holder; the top part where the candle goes serves as a home for my rings. *If you want it back Jess, I'll reluctantly send it to you. :)* So I moved my lamp in too, and made a home for my lovely necklace that my mom bought me for my 25th birthday, and voila! What was meant to be a simple lamp fix turned into a full blown jewelry display, and I love it. I hated hiding my fun costume jewelry away in drawers, and now I can see it even when I'm not wearing it.

I added a mirror that I got from Target on clearance... I think it is supposed to be a place "mat." Here's to cheap fixes and re-using items. Until tomorrow...

Friday, July 29, 2011

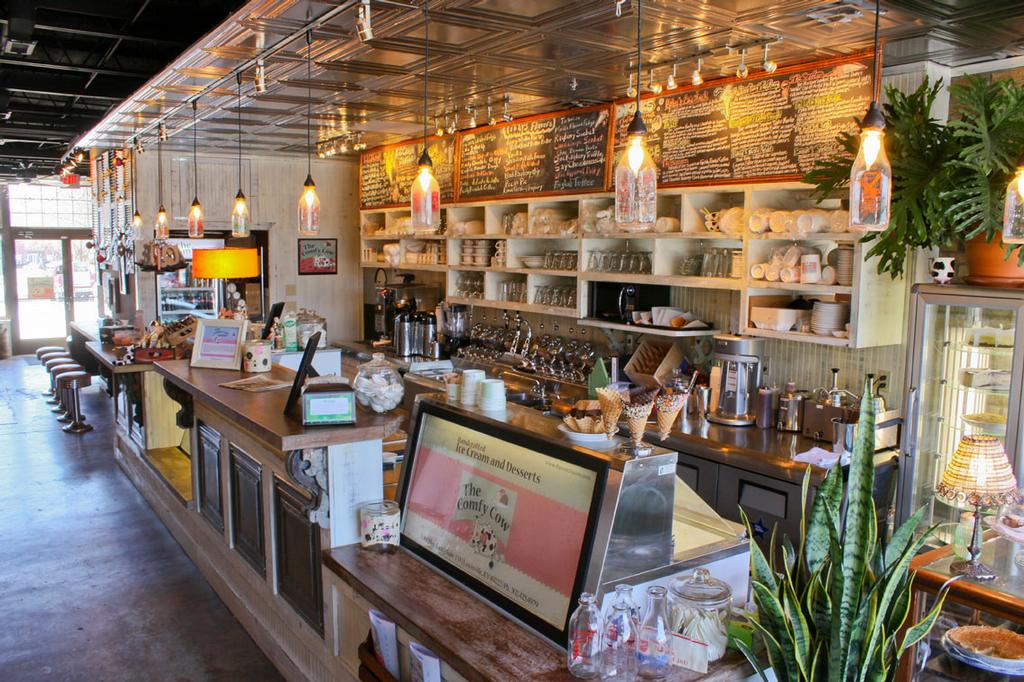
Louisville Love: The Comfy Cow

Hello Friends! I wanted to start a new portion of my blog where I can talk about unique Louisville stops that I love, and that I hope you try. I think I've talked about today's location before, but oh well! Today, I want share with you the goodness that is The Comfy Cow.


The Comfy Cow is located in Westport Village off of Westport Road, and soon other locations will be opening on Frankfort Avenue and near U of L's campus. What makes Comfy Cow unique are its amazing flavor combination. Each week they feature a foodie flavor of the week (lavender and honey, gin and juice, orange fennel), and it is guaranteed to be something that you won't find in any other Louisville locale. Beyond the outrageous flavors, they have normal flavors too, but they doctor them in such a way that no other ice cream parlor can come close to matching. They just put love and creativity into each batch.


Here are some examples of the flavors they have rotating now: Freshly Roasted Coffee, Cookie Monster Dough, Strawberry Fields Forever, Dulche de Leche de Salte, Gin and Juice, Bourbon Ball, Red Velvet Cake with White Chocolate Icing, German Chocolate Cake, and the list goes on and on. I guarantee you will be able to find something to strike your fancy.


The Comfy Cow was also recently featured on Travel Channel's Man vs. Food Nation. Wednesday, the Comfy Cow had a viewing party to reveal if the challenger could complete the Comfy Cow challenge. Unfortunately, he did not succeed, but the evening was great fun.


Check out the Comfy Cow.... I guarantee you won't be disappointed!

Images from here, here and here.

Wednesday, July 27, 2011

Mexican Hot Chocolate Cupcakes

As I have mentioned before, every Tuesday we get together with some friends from church. Yesterday, we had a fiesta. I wanted to bring dessert, so I decided that whatever I decided to make, it must be fiesta themed. I searched high and low, and I found a recipe for Mexican Hot Chocolate Cupcakes, and they were to die for.

The cupcakes themselves had a kind of "brownieness" to them; they were chewy but not at all stale or dense in texture. I took an apple corer, and hollowed out the middle. I filled them with caramel and topped them with a cayenne pepper-whipped cream-brown sugar frosting. The frosting is what made them. It was not overly sweet which made them dangerous to have around. I kept eating the whipped cream by the spoonful, and the slight spiciness gave it an addictive quality. I'm glad there's one left that I can eat today.


Mexican Hot Chocolate Cupcakes
From Cheeky Kitchen

Cupcakes:
3/4 cup sugar
3/4 cup brown sugar
2 eggs
1/2 cup canola oil (I used vegetable)
1/2 cup milk
1/2 teaspoon baking powder
1/8 teaspoon baking soda
1/4 teaspoon salt
1 teaspoon cinnamon
1 teaspoon vanilla
1/2 cup cocoa powder
1 1/4 cup all-purpose flour

Caramel Sauce:
See this recipe, or purchase some from your local grocer. I highly discourage the latter.

Cayenne Whipped Cream:
1 1/2 cups heavy whipping cream
1/2 cup brown sugar
1/4 teaspoon cayenne pepper

Garnish:
Shaved chocolate and red pepper flakes (mmmm....)

Directions:

Cupcakes:
1. Preheat oven to 350 and line cupcake pan with 22 liners.
2. In a large bowl, combine sugars, eggs, milk and oil.
3. Continue to add everything except the flour and cocoa. Stir until incorporated.
4. Slowly stir in the cocoa and flour, but only until just mixed in.
5. Spoon your batter into the cupcake liners, a little over half full. Bake for 17-19 minutes. Mine took 19.
6. Allow to cool completely.
7. Take an apple corer and hollow the center of each cupcake. Fill each hole with a spoonful of caramel.

Frosting:
1. Whip the cream so that soft peaks form. Slowly add the brown sugar and cayenne. You must use really fresh brown sugar or the frosting will be grainy. (Side note: It will be grainy for a few minutes though because the sugar needs to dissolve. It should lose that texture after 5 minutes.)
2. Pipe the frosting onto the cooled cupcakes.
3. Top with grated chocolate and a tiny bit of red pepper flakes.
4. Take them somewhere to share them so you don't eat the whole batch.

Enjoy!

Tuesday, July 26, 2011

Caramel Sauce

Oh what to say, what to say? Homemade caramel is absolutely the best, and I will never buy the store brands again. Last night, I made caramel for some cupcakes that I am making (I'll post those tomorrow), and it is absolutely the easiest and most fulfilling of recipes for the amount of time and effort it takes.

For the longest time, I was scared of caramel. I don't know why, but I always pictured it bubbling up (which it did) and ending in a burnt, sticky mess (it did not.) Actually, the end result was a thick, smooth topping that trumps any brand out there. Plus it only has 4 ingredients and one is water. My version is healthier (ha) and I know exactly what's in it. It would also make a lovely gift.Sass+Frass

Ingredients:
1 1/2 cups sugar
1/3 cup water
1 1/4 cup heavy cream
1/2 teaspoon vanilla

Directions:
1. Place the sugar in the center of a sauce pan, and add the water. DO NOT STIR. Why you ask? Sugar crystals will form up the side, and they don't dissolve easily once they harden. No stirring, no crystals in caramel.
2. Let the mixture boil; still do not stir, but keep a very close eye.
3. Wait until the mixture becomes a dark golden amber color (350 degrees on candy thermometer). Begin to slowly add your cream, but now you need to stir like crazy! The whole thing will bubble up and hiss, but fear not, it will calm down; just keep stirring and adding more cream.
4. Remove your caramel from the heat and stir in the vanilla. (A salted caramel alternative could be to add a dash of Himalayan sea salt... delish.)
5. Let the caramel cool to room temperature, jar it, and use when ready. It will continue to thicken as it cools, especially in the fridge.

Use as a topper on ice cream, cakes, toast (just kidding about the toast... or am I?)

Enjoy!