Yesterday was our cooking club to celebrate the upcoming Super Bowl! We made lots of treats, but the best thing, in my opinion, were the Southwestern egg rolls. They were spicy, but they were also full of spinach, black beans, corn and a little cheese. The kids loved them, and I could have made a meal out of them. I found the egg roll wrappers in the refrigerated section at Whole Foods, and I got whole frozen spinach there. (I don't like when it's all chopped up.) I bought roasted corn at Trader Joe's to make them a little more Southwestern. They were amazing!
Source: Annie's Eats
To see the recipe for Southwestern Egg Rolls, click here.
This coming Friday, the cooking club will be having an early Superbowl Party! We are going to make lots of delicious treats that the kids will be able to make at their own parties. I had all the recipes set, but I always like to let the kids make a fun type of dessert. I was looking through my Cuisine At Home magazine, and I found a recipe that is for Strawberry Pizza. While it is still a dessert, I like the fact that it has fresh fruit. I don't like to pump the kids full of sugar, and this is something that they can make totally from scratch and make it look pretty and taste good in a short amount of time.
I always like to try out recipes before I have the kids make them just so I will know what steps will be tricky and to make sure the recipe actually works. This one worked perfectly. The cookie is shortbread, so it's nice and crisp. It has a marscarpone topping and orange glazed strawberries. It looks and tastes quite impressive, but it's so easy that a child will be able to do it! I hope this encourages you to make it!
Strawberry Pizza Adapted from Cuisine at Home Issue No. 80 April 2010
Ingredients:
For the Shortbread:
2 cups all-purpose flour 3/4 cup chopped pecans (I made mine without because I wanted to see how it would taste... A few kids have nut allergies.) 2 Tbsp. corn starch 1 tsp. salt 2 sticks butter, softened 1/2 cup packed brown sugar
Directions:
Preheat the oven to 350. Line a cookie sheet with parchment paper. Whisk together everything but the butter and brown sugar; set aside. Using a hand mixer, cream the butter and sugar until mixture is light and fluffy, about five minutes. Add half of the flour mixture to the creamed mixture; beat on low until ingredients are combined. Add remaining flour, beating only until the flour is incorporated into the dough. Turn the dough onto prepared cookie sheet. Pat dough evenly into an 11-inch wide circle. Bake until the edges are firm and beginning to brown, 20-25 minutes. While the cookie is baking, prepare the remaining toppings. Cool on a rack five minutes, the chill in a freezer for about 30 minutes.
Ingredients for the glaze: 1/2 cup seedless, strawberry preserves 1/4 cup orange juice
Directions: Gently mix the preserves and juice together in a microwave safe bowl. Microwave for one minute and stir again. Place in the fridge to chill. WHEN it is CHILLED, pour on top of the sliced strawberries.
Ingredients:
1 lb. Strawberries
Directions: Rinse strawberries; then thinly slice.
Ingredients for Icing: 8 oz. marscarpone cheese 1/2 cup powdered sugar 1 tsp. vanilla
Directions: Add all ingredients into a bowl. Mix the ingredients on medium speed for about a minute. DO NOT OVER-MIX - the frosting may separate. Place in the fridge until ready to use.
To Assemble the Pizza: 1. Take pizza out of the freezer. 2. Spread marscarpone evenly onto the shortbread with a spatula. (I had better luck with a dull butter knife.) 3. Arrange strawberries on top, completely covering the top. 4. Use a vegetable peeler to shave curls of chocolate on top. 5. Cut into even slices and enjoy!
I've stated before that I am mildly Pinterest obsessed. I've had a picture saved to my desserts board, and I couldn't stand simply looking at it any more. The one thing about making a cake of three layers is that you really need an excuse to make it. It would be considered glutenous to make a cake for just two people, so I needed a large group; enter snack week.
Yesterday was my turn to bring snacks to my community group, and I decided to make a raspberry chocolate truffle cake. I saw this cake on Annie's Eats, but I tweaked it slightly. I have a chocolate cake recipe that I love and will never stray from. I used the raspberry filling and frosting recipe and the chocolate ganache recipe that hers called for. I decided not to add the chocolate glaze just because I thought it had enough chocolate and richness as it was. Below is my finished product. If you would like the original recipe, you can find it here.
Photo Compliments of my Lovely Husband :) He does a much better job than me.
Raspberry filling:16 oz. frozen raspberries, thawed 1/3 cup sugar 3 tbsp. cornstarch 1 tsp. lemon juice
Ganache filling: 8 oz. bittersweet chocolate, finely chopped 1 cup heavy cream 3 tbsp. unsalted butter, at room temperature
Raspberry frosting: 1 cup sugar 4 large egg whites 21 tbsp. unsalted butter, at room temperature 1/3 cup strained raspberry puree ½ tsp. vanilla extract
Directions:
To make the raspberry filling, drain the thawed berries, reserving the juice in a liquid measuring cup. Add enough water so that the total liquid equals 1¼ cups. Add the liquid to a medium saucepan with the sugar and cornstarch. Heat over medium-high heat, whisking occasionally, until the mixture begins to bubble and thicken. Continue whisking so no lumps form. Once thickened, remove from the heat and whisk in the lemon juice. Fold in the drained berries with a spatula. Cover and chill until ready to use. (The filling will continue to thicken as it chills.)
To make the ganache, place the chopped chocolate in a heatproof bowl. Heat the cream in a saucepan and bring to a simmer. Immediately remove from the heat and pour the hot cream over the chopped chocolate. Let stand 1-2 minutes, then whisk together until a smooth, thick ganache is formed. Whisk in the butter 1 tablespoon at a time until completely incorporated. Let the ganache sit to thicken a bit so that it is suitable for spreading and piping. (To speed thickening, place the bowl in the fridge or freezer and whisk every 10 minutes to ensure even cooling until the desired consistency is reached.) Transfer about ½ cup of the thickened ganache to a pastry bag fitted with a plain round tip about ½-inch in diameter. Reserve another ½ cup of ganache in a small bowl or container. (This can be used later for decorative detailing, if desired.)
To assemble the cake, place one of the cooled cake layers on a cake board or serving platter. Spread ½ cup of the ganache in an even layer over the cake. Using the reserved ganache in the pastry bag, pipe a border around the perimeter of the cake layer. This will act as a well to help hold in the raspberry filling. Spoon some of the raspberry filling inside the ganache border in an even layer. Top with another layer of cake and repeat this process, layering with another ½ cup of ganache and additional raspberry filling. Top with the remaining cake layer.
To make the raspberry frosting, combine the sugar and egg whites in a heatproof bowl set over a pot of simmering water. (I used my mixer bowl here to dirty one less dish.) Heat, whisking frequently, until the mixture reaches 160° F and the sugar has dissolved. Transfer the mixture to the bowl of a stand mixer fitted with the whisk attachment. Beat on medium-high speed until stiff peaks form and the mixture has cooled to room temperature, about 8 minutes. (The bowl should be cool to the touch.) Reduce the speed to medium and add the butter, 2 tablespoons at a time, adding more once each addition has been incorporated. If the frosting looks soupy or curdled, continue to beat on medium-high speed until thick and smooth again, about 3-5 minutes more (or longer – don’t worry, it will come together!) Blend in the raspberry puree and vanilla until smooth and completely incorporated, scraping down the sides of the bowl as needed.
Frost the top and sides of the assembled cake with the raspberry buttercream, smoothing the surface as much as possible. Chill until ready to serve.
Well friends, you can probably tell that I have been super busy this week. My posts have become fewer, but I plan to steadily continue. Tomorrow is the first day of school, and I am very excited. I have been thinking about and praying for the new little ones that will quickly become part of my everyday.
Here are some of my favorite school ideas that I will be testing out on them this year...
I love the idea of turning normal crates into lovely chairs... plus you can't beat the extra storage.
C.S. Lewis' quotes inspire me to think deeply about topics that I wouldn't always choose to consider on my own. Hopefully, he (and I) will do the same for my students.I've yet to meet a kid who doesn't like candy, so I'll take the help I can get to make them excited about reading.I love this idea too! What a fun way to remember birthdays!And of course I bake for them. They would simply love this. Last year I made my darlings maple bacon cupcakes, and I had them hooked. :)
So tomorrow, keep all the little children and their teachers in mind; it's going to be a long but exciting day.
Game night means dessert, and I wanted to find something that was incredibly festive to make. I was looking over at Annie's Eats, and I found a recipe for Cherry Limeade Cupcakes. These looked perfect so I decided to make them. Here's my finished product:
And I packed them up so they were ready to go! They were super tasty, but they were super sweet. I think if I make them again that I will make them mini. If you like sweet, you will love these, but if that's not your thing, you may want to opt for something else.
As I have mentioned before, every Tuesday we get together with some friends from church. Yesterday, we had a fiesta. I wanted to bring dessert, so I decided that whatever I decided to make, it must be fiesta themed. I searched high and low, and I found a recipe for Mexican Hot Chocolate Cupcakes, and they were to die for.
The cupcakes themselves had a kind of "brownieness" to them; they were chewy but not at all stale or dense in texture. I took an apple corer, and hollowed out the middle. I filled them with caramel and topped them with a cayenne pepper-whipped cream-brown sugar frosting. The frosting is what made them. It was not overly sweet which made them dangerous to have around. I kept eating the whipped cream by the spoonful, and the slight spiciness gave it an addictive quality. I'm glad there's one left that I can eat today.
Cupcakes: 3/4 cup sugar 3/4 cup brown sugar 2 eggs 1/2 cup canola oil (I used vegetable) 1/2 cup milk 1/2 teaspoon baking powder 1/8 teaspoon baking soda 1/4 teaspoon salt 1 teaspoon cinnamon 1 teaspoon vanilla 1/2 cup cocoa powder 1 1/4 cup all-purpose flour
Caramel Sauce: See this recipe, or purchase some from your local grocer. I highly discourage the latter.
Cayenne Whipped Cream: 1 1/2 cups heavy whipping cream 1/2 cup brown sugar 1/4 teaspoon cayenne pepper
Garnish: Shaved chocolate and red pepper flakes (mmmm....)
Directions:
Cupcakes: 1. Preheat oven to 350 and line cupcake pan with 22 liners. 2. In a large bowl, combine sugars, eggs, milk and oil. 3. Continue to add everything except the flour and cocoa. Stir until incorporated. 4. Slowly stir in the cocoa and flour, but only until just mixed in. 5. Spoon your batter into the cupcake liners, a little over half full. Bake for 17-19 minutes. Mine took 19. 6. Allow to cool completely. 7. Take an apple corer and hollow the center of each cupcake. Fill each hole with a spoonful of caramel.
Frosting: 1. Whip the cream so that soft peaks form. Slowly add the brown sugar and cayenne. You must use really fresh brown sugar or the frosting will be grainy. (Side note: It will be grainy for a few minutes though because the sugar needs to dissolve. It should lose that texture after 5 minutes.) 2. Pipe the frosting onto the cooled cupcakes. 3. Top with grated chocolate and a tiny bit of red pepper flakes. 4. Take them somewhere to share them so you don't eat the whole batch.
I love ice creams that have something extra to them. This ice cream was perfect for me! For my birthday, my husband bought me an ice cream maker, and he has greatly benefited from this purchase. I made this blackberry crisp ice cream from a combination of sources, and it turned out nicely. It also made the perfect amount for two people. (one quart) Take advantage while blackberries are in season!
2 sticks butter, cut into 1/2 cubes, chilled 1 1/2 cups all purpose flour 1/8 teaspoon cinnamon 3/4 cup packed light brown sugar 1/2 teaspoon salt 1 1/2 cups quick cooking oats
1. Preheat the oven to 350. 2. Put all the ingredients except oats in a bowl. Blend quickly so that the mixture looks like coarse sand. Add the oats; mix well. (Try not to melt the butter.) 3. Spread onto an ungreased baking sheet, and break up any large clumps. 4. Bake for 30-35 minutes until toasted and brown. Stir frequently, especially the corners. Let it cool completely, then freeze until ready to use. Can be frozen for one month.
*This makes a ton!*
Step Two: Make the Blackberry Sauce
Blackberry Sauce Jeni's Splendid Ice Creams at Home Makes 1 1/4 cup
2 cups blackberries (or any berry) 1 cup sugar
1. Combine berries and sugar in a small sauce pan; bring to a boil. Continue stirring 5-8 minutes. 2. Let it cool slightly, then force the sauce through a sieve to remove the seeds. (I left some in to show it's legit.) Refrigerate until cold and ready to use.
Step 3: Make the Ice Cream
Sweet Cream Ice Cream Cuisine at Home Issue No. 75
3 egg yolks 3/4 cup sugar, divided 1 1/2 cups whole milk 1 cup heavy cream
1. Whisk together egg yolks and 1/4 cup sugar; set aside. 2. Heat milk, heavy cream and sugar in a sauce pan until steam rises. Gradually add half of the hot mixture to the eggs, whisking constantly. Add yolk mixture to remaining hot milk. Reduce heat to medium-low for 5-8 minutes, stirring constantly. 3. Strain ice cream base into a bowl and cool in an ice bath. Cover bowl; chill 4-12 hours. Churn according to machine directions.
Step Four: Mix it all together!
1. Add a layer of ice cream into your freezer safe tupperware dish. 2. Add a layer of your crisp. 3. Drizzle the blackberry sauce. 4. Repeat - think lasagna.
Let it set for a few hours and voila - ice cream that anyone would be lucky to have. Perfect for the hot summer days we've been having.
Saturday, my husband downed a huge milk shake, a plate of fries, a huge piece of pizza, a cannoli and multiple other delicious things that are not the most health friendly; so Sunday, he declared that we not eat meat. Wanting to oblige, I found this delicious recipe for stuffed poblano chiles with a black bean saute. They were so stinkin' good! I love the poblanos that are deep fried and stuffed with cheese, and I like to think that these are a slightly more healthy variation. The filling (potatoes, cheese, jalapenos... need I say more?) is what makes these taste *amazing*, and the smokiness of the poblano isn't too shabby itself. Fine Cooking 's Chicken & Rice Version
Potato-Stuffed Poblanos Cuisine at Home Issue No. 85
2 large poblano chiles Filling: 2 cups cubed red potatoes (skins on) 1/2 cup sliced yellow onion 1 cup shredded Monterey Jack cheese, divided 1/4 cup chopped scallions 3 Tbsp. cream cheese 3 Tbsp. canned diced green chiles 1 Tbsp. sour cream 1 tsp. garlic powder 1/4 tsp. ground cumin 2 tsp. fresh lime juice salt and pepper to taste
Directions: 1. Preheat oven to 425. Coat a baking sheet with nonstick spray. 2. Roast poblanos over a gas burner or under a broiler until skin blackens. Transfer to a bowl and steam for 10 minutes. (Cover with plastic wrap.) Peel off skin. 3. Cut a slit down one side of pepper. Discard seeds.
4. For filling, bowl potatoes and onions together until potatoes are cooked through. Make sure moisture is evaporated. 5. Mash potatoes with all of the filling ingredients. 6. Divide filling between poblanos and sprinkle with remaining cheese. 7. Bake until cheese is golden brown, 20-25 minutes.
Black Bean Saute
Soften 1/2 cup onion in oil with 1/2 tsp. cumin and 1 bay leaf. (5 minutes) Stir in one can black beans (rinsed), 1/2 cup frozen corn kernels, 1/2 tsp. dried oregano, 1/4 cup scallions, 1 tsp. minced garlic; heat through. Stir in 2 tsp. lime juice, salt and pepper to taste, and enjoy!
Scott nor I could finish ours, so you may be able to save some for the next day too...
Enjoy this hearty vegetarian meal that no one will complain about! Until next time...
Today's a snow day, but yesterday was our teacher birthday party. I always make a cake, and I was scouring Annie's Eats to find a new dessert to be devoured. I found the Tuxedo Cake, and I decided it would be perfect. I did change the chocolate cake recipe, though. I have one that is tried and true, so I figured why mess with a good thing?
Image from Annie's Eats Everyone raved over the cake, and I agree. It was very good. The "frosting" is simply a massive amount of heavy whipping cream(4 cups to be exact) and some powdered sugar. It is topped with a chocolate ganache and chocolate covered strawberries... mmm. :)
Here are my steps:
Step 1: Make the cake! Annie's recipe calls for this cake, but I used mine. Click here for my recipe. Make sure to let it cool completely before frosting. (I put mine in the freezer just so it wouldn't get crumbs in the pure white cream.)
Step 2: Make the frosting. You will need 4 cups heavy whipping cream and 1 1/2 cups sifted powdered sugar. Beat the heavy cream to sift peaks, then add the sugar slowly. Continue to beat until stiff peaks form. Do not over beat.
Step 3: Frost the cake. This frosting makes plenty to make the cake, so add lots of frosting. :) Once the cake is set, put the cake in the fridge for at least an hour before topping with ganache.
Step 4: Make the chocolate covered strawberries. You will need about 6 strawberries and half a bag of chocolate for dipping. If you want to drizzle with white chocolate, you will need about 1/4 of a bag. Clean the strawberries, and make sure they are very dry. Melt the chocolate and dip strawberries. Place on wax paper on a baking pan, then put the strawberries in the freezer to harden. Melt the white chocolate, then drizzle over the strawberries.
Step 5: Make the ganache. You will need 1/2 cup heavy whipping cream, 4 ounces baker's chocolate, 1/4 cup corn syrup and 1 tsp. of vanilla. Simmer the heavy whipping cream then remove from heat. Add the chocolate and stir until melted. Add the syrup and vanilla. Let the chocolate set for 10 minutes to thicken then pour over the cake. Add the strawberries to the top so they can set in the ganache. Place the back in the fridge until you are ready to serve.
It seems like a lot to do, but make the cake the day before and freeze it! Make everything else the next day. You'll save your mind by using time wisely. Break apart preparation and clean up!
I'm on a peppermint kick, I know. I can't help myself. I'm so excited about Christmas. This weekend as I was taking out my Christmas decorations, I found myself thinking that I had less than I remembered, which is fine, but I have found myself scouring the internet to find easy to make, cheap to buy decorations that don't look like either of those things. I keep telling myself that the tree isn't up yet, and that will make the difference, but I am keeping some of these ideas on the back-burner. Until then, here are some of the lovely red and white tables (and a kitchen just for kicks) that's I'll be keeping my eye on.
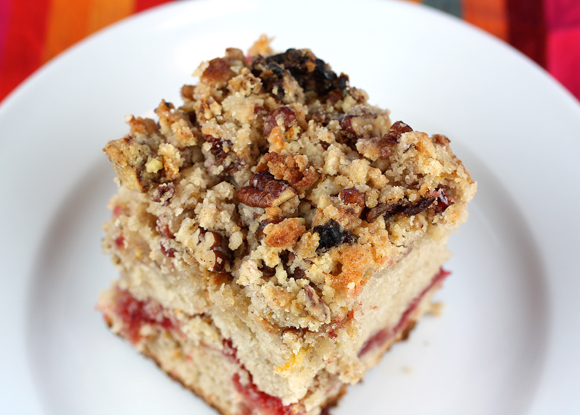
I realize it has been over a month since my last post, and I will try to do much better! I don't really have any excuse, but I do has a delicious coffee cake as a peace offering. I made this last year for my friend's bridal shower, and was so sad to realize that cranberries are not sold in grocery stores all year long. However, when I was at Whole Foods Monday I saw that they were back, and I had to buy them. Hence the cranberry coffee cake. This is one of the best coffee cakes ever... anything with nearly four sticks of butter better be good, but this has fruit and nuts too, so it must have some nutritional value. I will not post the calorie count because I think we are better off without it :) but this is something that you can certainly share with lots of friends. Everything in moderation right?
Here's the recipe:
Cranberry Coffee Cake
Cuisine at Home Issue #78
Makes 16 servings
Total Time: 1 ½ hours + Cooling
For the Streusel –
1/2 stick unsalted butter
2/3 cup all-purpose flour
1/3 cup chopped toasted pecans
1/3 cup dried cranberries
1/4 cup sugar
2 Tbsp. minced orange zest
For the Cake –
1 cup fresh cranberries
2 ¼ cup sugar, divided
Zest of ½ an orange
2 cups all-purpose flour
1 tsp. each table salt and cinnamon
½ tsp. baking powder
4 eggs, plus 1 egg yolk
3 sticks unsalted butter, softened
Directions:
Preheat oven to 350°.Coat a 9-inch-square baking pan with nonstick spray.Line the pan with parchment paper so it hangs over the edges to create handles; spray again.
Melt the ½ stick butter; stir in 2/3 cup flour, ¼ cup sugar, pecans, cranberries and orange zest.Set aside.
Pulse fresh cranberries, ¾ cup sugar and zest in a food processor; set aside.Whisk together the 2 cups flour, salt, cinnamon and baking powder in a bowl.Whisk together eggs and yolk; set aside.
Using a hand mixer, cream the 3 sticks butter and remaining sugar.Add flour mixture and eggs alternately to the butter mixture, beating well after each addition.Transfer half of the batter to the prepared pan; top with cranberry mixture and the rest of the batter, smoothing each layer.Use a knife to swirl batter and cranberries; top with streusel.
Bake cake 55-60 minutes; cool on rack 20 minutes before serving.
It's super easy and very delicious. I hope you can find someone to share it with!
I promise I won't be an awful blogger... I've got lots to share!
I have a new addiction, and it was a complete accident. I was at the grocery store last week minding my own business when all of the sudden I spotted a sample. I don't always take the samples, but this item looked unique and the packaging was so well put together that I simply couldn't resist. The sample was for Raincoast Crisps, a small, circular cracker with all sorts of tasty things inside like cranberries and hazelnuts. I was expecting a excessively crunchy cracker that tasted like "health food," but I was pleasantly surprised that it had a slight chewiness about it and that it did not lack in flavor. I couldn't resist buying a package, but only one because they were ridiculously expensive. I set out to find a recipe for these tasty bites, and I found just that at Dinner with Julie. Her recipe makes the Rosemary Raisin variety, but to make the Cranberry Hazelnut kind that I have been raving about simply omit the rosemary, substitute cranberries for the raisins, and substitute hazelnuts for the pecans. Follow everything else exactly.
I hope that you give these festive little crackers a try, and when you do, add some brie to them! These would also be fantastic to give as hostess gifts or for Christmas. Mmmm.... Have a lovely evening.
Hello Friends! Peaches are everywhere right now, and I've used them to create an inspiration board for a wedding or party. Check out my other blog to see those ideas! Have a great day!
Hopefully you have your decorations set for the fourth of July; now to work on your menu. These are the prettiest desserts around. I haven't made any of these, but they come from Martha Stewart and Ina Garten, and what food from them isn't good? Let me know if you end up making these, and tell me if they are a hit or miss. Happy Fourth of July!
Click the picture to link to the recipes.Above from Ina Garten Above from Pillsbury Above from Better Homes and Gardens
While we were in San Francisco, Scott and I had watermelon water. It was so cool and freshing, and it would be perfect to break out on these hot days. Here is the recipe: Ingredients: *4 cups cubed seedless watermelon *4 cups cold water *1/2 sugar (or to taste)
Directions: Add 2 cups of watermelon and 1 cup of water to the blender. Pulse until the water melon is smooth. Sample some so that there are not any larger pieces. Pour this mixture into a larger pitcher and repeat the previous steps. Then add 2 cups of water and sugar to taste to the blender. Pulse until the sugar has dissolved, and add this to the watermelon mixture. Refrigerate until cold, and enjoy!
I am a twenty-six year old that likes many things. I have a knack for making desserts, try to have a knack (and a budget) for decorating, and I love trying new things in my city.